
Inside the Mite - a Study of Wood Deterioration
Part I
Words and photos by Dick Rank
(Click on the photos to
see larger versions)
It has been my good fortune to examine three Mites stripped of fabric, and to work at restoring three others. Some interesting patterns of deterioration became evident. I'll try to systematically illustrate them for all of our Mite Site readers, with the hope that as we all learn more about our wonderful flying machines, we will fly safer. Besides, I'll get a chance to use my new digital camera in the process.
FAA airworthiness directives have already anticipated these typical deterioration patterns, but it is worthwhile to know the details behind them. Much of what I will say is already known by many of you. Tony Terrigno, Ben Favrholdt, Fred Schmidt and others have forgotten more that I will ever know about the Mite, but here goes anyway.
In general, most of our structural problems can develop because of the two enemies of glue strength, heat and moisture. I've noted in past correspondence that some owners are not clear concerning these two nasty realities, and how to deal with them. The glues used when the Mites were assembled were very inferior to what we have available today. In the fifties, both casein and urea formaldehyde glues were used in aircraft. Such glues were adequate when not exposed to moisture and heat, but as in the case of the British Mosquitoes shipped to southeast Asia, glue strength went down quickly, with disastrous results. Moisture and heat are a necessary part of an aircraft's life.
Bob Whittier has written at length in The Experimenter about advantages of various glues, as has the U.S. Forest Service. Their research shows Resorcinol and some epoxy glues to be far superior in strength and resistance to heat and moisture. The most recent revision of 43-13 contains the same conclusions. It appears from research results that epoxies are somewhat superior if spacing in the glue joint is not perfect. We routinely use resorcinol, and T-88 when appropriate. If epoxy and resorcinol glues, along with epoxy varnish are applied properly in repair and renovation work, Mites will outlast us all.
How can we routinely minimize glue degradation? If you live in the southwest areas of low humidity, part of the problem is solved. Keeping the aircraft out of direct sun for long periods helps as well. If the aircraft is exposed to heavy rain, it is important to dry it as quickly as possible, checking for pockets of accumulated water in wing spaces and rear fuselage. Drain holes should be checked frequently to insure that they are open, allowing water to drain out of critical spaces.
Tail feathers seem to be a good place to start. Pictures are from 118C, which was left out in hot humid conditions and rain for two years in Atlanta, Georgia. Some of the glue had deteriorated into a brown sugar appearance with little or no strength. Fuselage drain holes were plugged by dirt daubers, a friendly insect that does a lot of damage. Unplugging the drains released two quarts of water from the fuselage alone. Pictures of this damage will be in later notes. with termites everywherein this area, it didn't help our confidence when "spam can" mechanics planted a pile of sawdust under the aircraft one night.
The "full empennage" trim system of Mooney design allows water to run down the vertical stabilizer into the fuselage between the stabilizer and the vertical fairings. As we saw recently, the vertical stabilizer spar can develop rot at the juncture of its bottom rib and its mounting points.
You can see from Picture #1 that this spar is in good shape. It should have extra layers of aircraft plywood on its front and back surfaces at the lower end. Fabric on this stabilizer had been seriously over tightened, distorting the bottom rib upward over one inch, and distorting the plywood gussets that lock it to the spar. This same "scalloping" was present on all trailing edges due to fabric being over tightened.
If you have read the accident report elsewhere on the Mite Site, you know what happens when faulty construction and/or rot weaken the hinge points on the horizontal stabilizer. We have seen frequent deterioration due to moisture where elevators and rudder attach to wooden airframe structures.

Picture #2 shows an outboard hinge point on the horizontal stabilizer. A metal bushing inserted through a plywood block on the trailing edge will attract interior airborne moisture and may also get wet in heavy rain because the fabric is penetrated by an attach bolt at those points.
AD-17 requires among other things that fabric installed on the horizontal stabilizer should not be seamed at the trailing edge, but should be continuously brought around the trailing edge to add strength to these attach points. Fabric does greatly add strength when properly installed. By removing one attach bolt and inserting a 6 inch long bolt temporarily, you can apply pressure to all points of the compass and feel play due to serious deterioration. However, if buying a Mite or to insure a safe aircraft, it is still best to bite the bullet and strip the horizontal stabilizer for a thorough inspection, and remove the vertical stabilizer to inspect its spar.
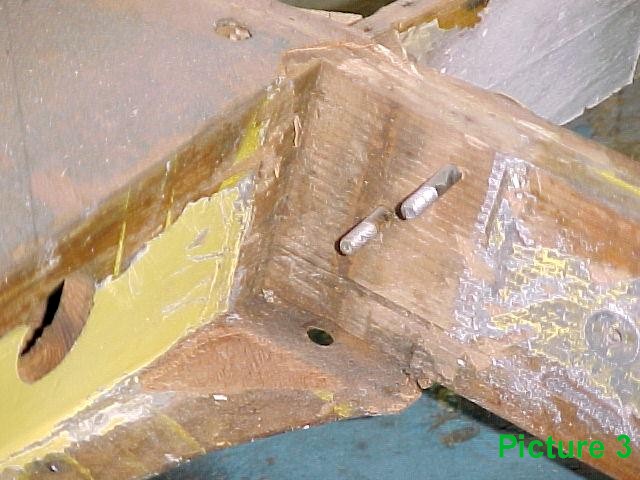
A final comment regarding tail feathers: We did find a crack in the horizontal stabilizer main spar almost in the center of the structure. In Picture #3, you can see the crack running across from the left rib about one inch below the mounting bolts. From other sources, this seems to be a common problem which should be discovered during annual inspections. It is repairable in most cases.
©2001 Richard C. Rank